Kategorie
Extension – Smart EV Charging with EVCC
Extension – Smart EV Charging with EVCC


What is EVCC?
EVCC (Electric Vehicle Charging Controller) is open-source software for smart electric vehicle charging management. Its main goal is to optimize charging based on available solar energy, tariffs, and other factors.
Main Features of EVCC:
✅ Integration with various PV systems – allows charging an EV with excess solar energy (compatible with Victron, Solax, GoodWe, Growatt, and more)
✅ Smart charging control – optimizes power based on available electricity and user needs
✅ Support for various wallboxes – compatible with many chargers (e.g., Victron, Pulsar, Solax, OpenWB, Tesla, go-e Charger, and more)
✅ Integration with home automation – available add-on for OpenHAB or Home Assistant, or other systems via MQTT
✅ Support for various tariffs – allows setting charging based on electricity prices - SPOT guide in CZK including peak/off-peak rates below
✅ Support for various BEVs – Tesla, BMW, Škoda, Hyundai, Volkswagen
EVCC is ideal for those who want to minimize charging costs and maximize the use of renewable energy sources.
More information and documentation can be found on the official website: https://evcc.io
What do we need?
PiCloud - installation instructions can be found in the previous article
How to do it
1) Installation
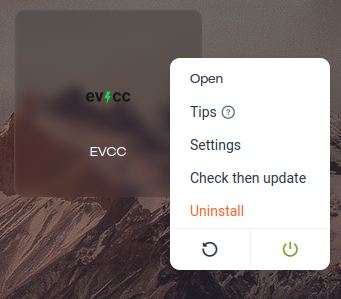
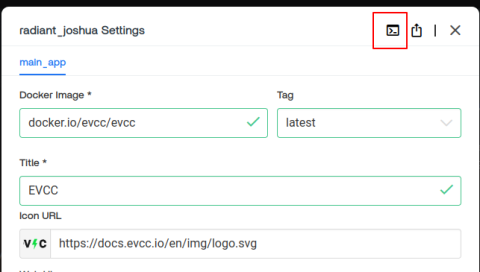
Log in to the Casa OS container manager, open the applications, and select Custom install in the top right.

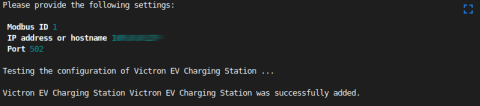
Fill in the window as shown in the image below. Instead of 10.0.0.30, enter your Pi-Cloud's IP address! Don’t forget the port, EVCC uses port 7070. Finally, select Install
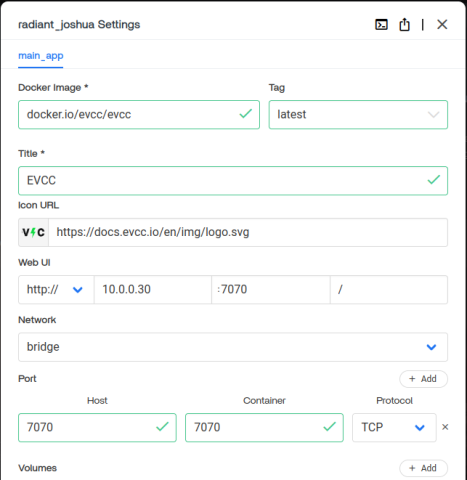
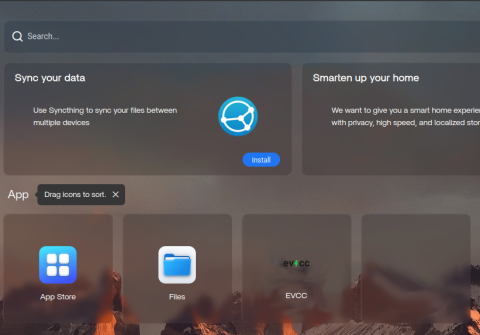
After installation, the application should be available in Docker. Check if you can access the demo by clicking on the application icon. It should direct you to port 7070 and load the demo UI.
2) Configuration
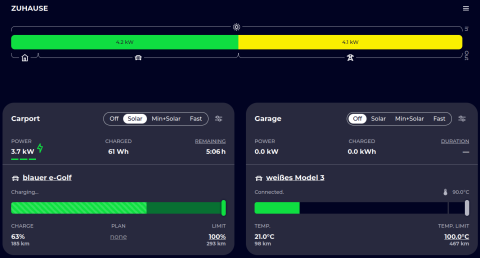
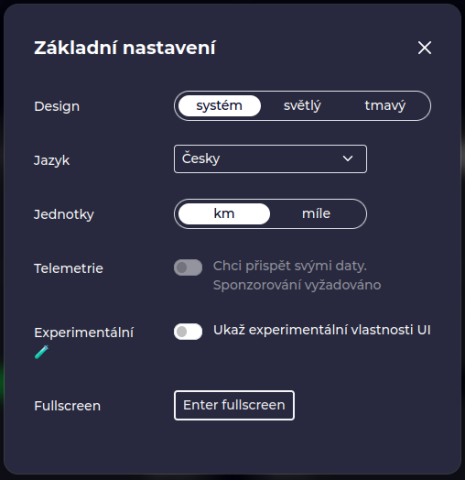
We need to perform the necessary configuration. First, change the interface language to your preferred language, below Czech example, through the menu icon in the top right and select User Interface to explore the UI.
a) Configuration for Experienced Users
It is possible to create the configuration manually by editing the evcc.yaml file. Simply add the configuration by copying and modifying the code from the documentation, for example, for Victron Charger.
b) Step-by-step configuration for beginners
The team at evcc has prepared a set of questions where you simply answer yes, no, or specify what kind of inverter, charger, car, etc., you have, and the configuration will be generated automatically. The configuration is saved in the evcc.yaml file. However, this file is inside the application container, so you need to access it via the terminal - don’t worry, it's simple! At least you can say you know how to use Linux 
In the Casa OS application window - right-click on the evcc application and select Settings. Then open the terminal in the given container using the left icon in the upper right corner
In the opened terminal window, type the command:
LANG=en evcc configure
![]()
Below you will find an example configuration for a setup with Victron PV, Victron Charger, and BMW i3. For other devices, the options and values may differ. Always refer to the official evcc documentation. If you manage to create various configurations, we would appreciate you sharing your evcc.yaml file without sensitive information like VIN, IP addresses, or passwords - it will inspire other users.
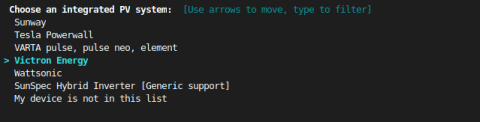
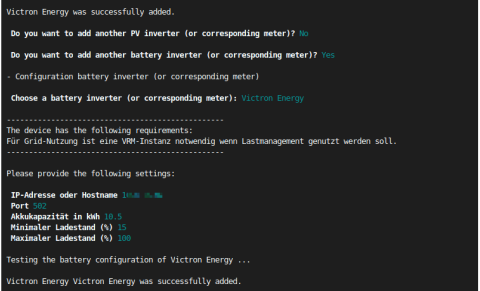
Automatic configuration for Victron PV - Victron EV Charger - BMW i3
Select Advanced mode -> Create a new evcc configuration file

Select the brand of your PV inverter
Enter the IP address of your PV inverter. For our case, Victron, keep the port at 502 and specify the allowed charge/discharge percentage values of the battery.
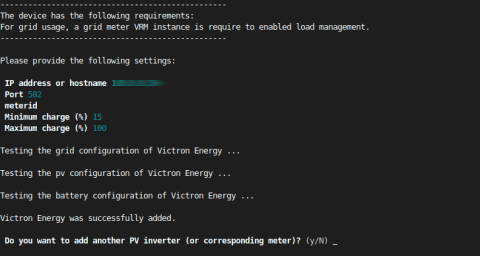
Then add the Battery Inverter Victron, again with the same details plus battery capacity in kWh.
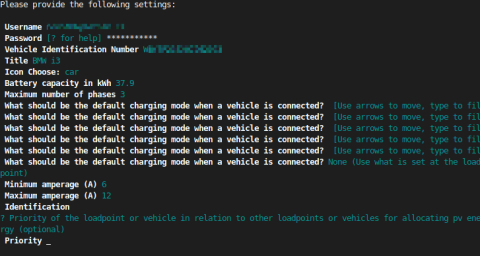
Now add your car, in this case, a BMW i3. Enter your MyBMW login details and VIN. Then specify the total battery capacity, number of phases, minimum and maximum current (in our case, 12A due to a low main circuit breaker).
Note: MyBMW now requires an authentication token. You can generate it here: https://bimmer-connected.readthedocs.io/en/stable/captcha/rest_of_world.html
Once generated, copy and paste it when prompted to fill in the hcaptcha field. Leave the identification field empty, and set priority to 1 (used when multiple BEVs are present).
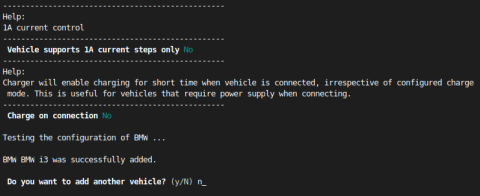
Finally, fill in whether the car supports 1A steps only and whether it should start charging automatically upon connection.
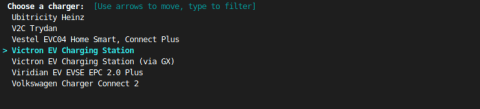
The last step is adding the charger. Again, for Victron:
Adding spot prices and calculating the current electricity price in CZK, including peak/off-peak rates (VT/NT). This functionality requires using the terminal again. After auto-configuration, you should already have the evcc.yaml file in the root directory (/app#). We need to edit it and add the tariffs section. To fetch spot prices, we use the ENTSOE server. The data is free, but you need a token, so you must create an account. Register here. Click on Login and then Register. After registering, request a token in the settings MySettings and click on Generate Token. It may take 24 - 48 hours to receive the token.
To edit, we need to install a proper text editor. A popular choice in the Linux world is nano.
Install it using the command:
apk add nano
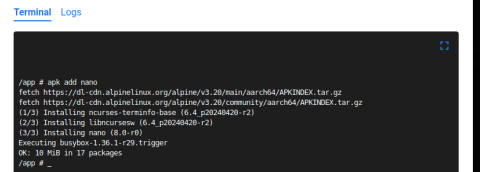
Now we can start editing the evcc.yaml file by entering the command:
nano evcc.yaml
Add the following tariffs section somewhere in the file:
tariffs:
currency: CZK
grid:
type: template
template: entsoe
securitytoken: your_token_from_entsoe
domain: BZN|CZ # see https://transparency.entsoe.eu/content/static_content/Static%20content/web%20api/Guide.html#_areas (optional)
charges: 0.897 # Additional fixed charge per kWh (e.g. 0.05 for 5 cents) (optional)
tax: 0.21 # Additional percentage charge (e.g. 0.2 for 20%) (optional)
formula: extra := 0.21; if ((ts.Hour() >= 10 && ts.Hour() < 11) || (ts.Hour() >= 12 && ts.Hour() < 13) || (ts.Hour() >= 14 && ts.Hour() < 15) || (ts.Hour() >= 17 && ts.Hour() < 18)) { extra = 0.72 }; (price*25 + charges + extra) * (1 + tax)
How is it calculated?
This calculation applies to the D57 distribution rate in the Prague-East area. The charges represent the total fees per kWh in CZK (0.897) added to the spot price. DeltaGreen supplier transparently lists and breaks these down in Czech market, making it possible to calculate:
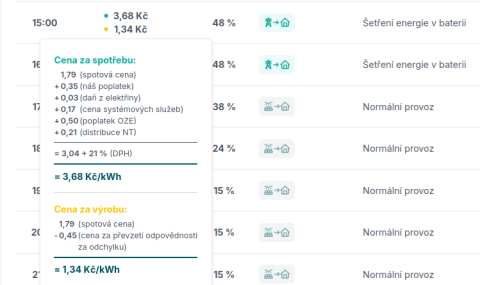
There are conditions where, during the off-peak (NT), distribution costs 0.21 CZK, and during peak hours (VT), it costs 0.72 CZK. Finally, the spot price is multiplied by the EUR exchange rate (rounded to 25 for now), and the surcharges are added. If someone can fetch the exchange rate externally, please share how to implement it—you'll earn a green maze badge . You can see the prices in the Forecast. Feel free to use for any other currency.


Add comment