Voice control of the house

Voice control of the house

In this article, we will connect the Amazon Echo Dot voice assistant with open source home automation. We won't be using OpenHAB Cloud, so everything runs locally. In this case, a few additional settings are necessary, but the result is worth it!

Hardware

Pi-Home - if you don't have it, see the section How to do it

Alexa Echo Dot

Software

OpenHAB 3


Procedure:

1) Connect to Raspberry via SSH and install nginx to redirect traffic from port 8080 to port 80 (default port for HTTP traffic)

 sudo apt-get update && sudo apt-get install nginx


2) Then edit the configuration file by command below and insert the following code into the file:

sudo nano /etc/nginx/sites-enabled/default

server{

listen 80;
 listen [::]:80;


 location / {
   proxy_pass http://127.0.0.1:8080/;
   proxy_set_header Host $http_host;
   proxy_set_header X-Real-IP $remote_addr;
   proxy_set_header X-Forwarded-For $proxy_add_x_forwarded_for;
   proxy_set_header X-Forwarded-Proto $scheme;
 }

 location /api {
   proxy_pass http://localhost:8080/api/;
 }
}


Save by pressing Ctrl+o and close the nano editor (Ctrl+x).

 Check if the configuration is correct with the command:

sudo nginx -t

If it says OK, restart nginx

sudo service nginx restart


3) Now enter your OpenHAB IP address in the browser. You should reach OpenHAB on default port 80. To connect with Alexa, we will use the "Hue emulation" binding. Install it in the Bindings section:


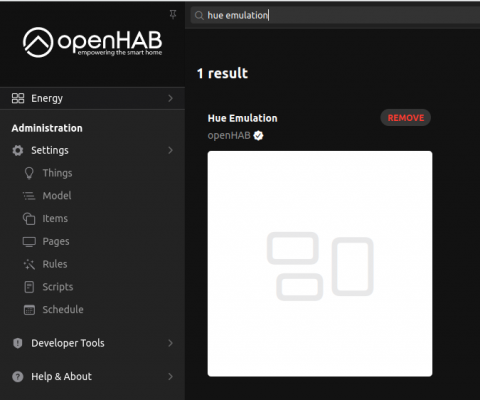
 After installation, click Settings -> then at the bottom right, expand Other services and click on Hue Emulation.

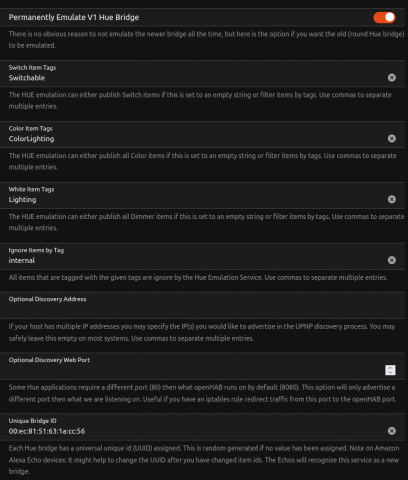
Check Show advanced. Fill in at least 120 seconds for the pairing time. If you have an older Alexa, also check the option

Pairing: Temporarily Emulate V1 Hue Bridge and manually enter the Unique Bridge ID.
 
Enter a value in the format: 00:ec:81:51:63:1a:cc:56. You can change it as desired. Do not leave the long automatic code. It may not work.
 
 
After changing the Unique Bridge ID, you need to restart the Raspberry Pi.
 
After the restart, click on Settings -> then at the bottom right in Other services, expand Hue Emulation and check Device pairing and click Save. Now try entering the following address in your browser:
http://your_openhab_address/api/status.
 
You should see something similar.


Finally, connect Alexa to the same Wi-Fi range as your OpenHAB. Now connect to Alexa either through the web interface: https://alexa.amazon.com/ or through the mobile app and select Smart Home -> Devices -> Scan. Meanwhile, start Device pairing in OpenHAB again, which will run for the set 120 seconds. Alexa should automatically detect objects with the tags "Switchable," "ColorLighting," or "Lighting".
 
In OpenHAB 3, you only need to add the "Switchable" tag to the items you want to control.


Alternatively, you can insert/update Items in text format.
 
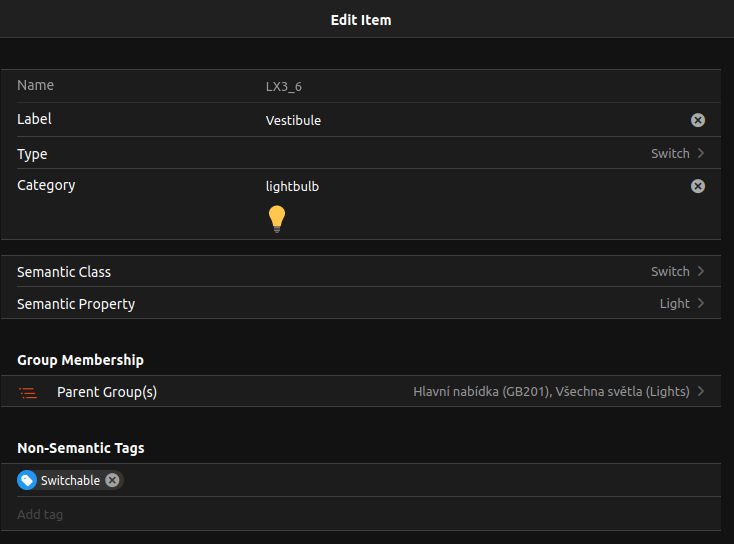
Switch  TestSwitch      "Kitchen Switch" [ "Switchable" ]    {channel="..."}
Color   TestColorBulb   "Bathroom"       [ "ColorLighting" ] {channel="..."}
Dimmer  TestDimmer      "Hallway"        [ "Lighting" ]      {channel="..."}


Final note:

Alexa currently only works in a few world languages, so you can use English or German. Therefore, in some cases, a change in the names of lights may be required. For example, turn on a light by saying: "Alexa, turn on living light" (Turns on a light named living light).

Tip:

The goal is, of course, to have as many functions as possible. In OpenHAB, create new dump Switch items, such as "Alarm" and add tag "Switchable". Then add a rule, for example, to arm the house after 60 seconds. When leaving, simply say to Alexa: "Alexa, turn on Alarm".

Note: Of course, it doesn't make sense to turn off the alarm by voice for security reasons ;) For that, we use an application or NFC tag. They are secure.


Rate the article:

No votes yet

Support Us:

Add comment:

Add comment

Newest articles in blog

Smart Home GoodWe inverter
Smart Home vs GoodWeRating: 
50%

In the post, we will demonstrate step by step how to communicate directly with the GoodWe inverter in a smart home setup and obtain real-time information (unlike the SEMS portal). This information is essential if we want to react to current parameters in a smart home, such as activating additional cooling or controlling a socket with a various load.

Voice control smart home
Voice control of the houseRating: 
0%

In this article, we will connect the Amazon Echo Dot voice assistant with open source home automation. We won't be using OpenHAB Cloud, so everything runs locally. In this case, a few additional settings are necessary, but the result is worth it!

MikroTik - Winbox, DHCP, Ranges
Basics - Winbox, DHCPRating: 
65.9%

In this series, we will look at the step-by-step setup of MikroTik devices for home users or a small business (up to 25 people). In the first article, we will focus on the initial setup - we will download Winbox and set up DHCP for the primary network and guest network. Similarly, we will also adjust the WiFi settings.

Alarm Smart Home PIR
Alarm from existing PIR sensors in a smart home.Rating: 
0%

In a your smart home, PIR sensors may not only be used to switch lights on and off based on motion, it is possible to utilize these sensors to detect the presence of motion in a particular room. This information can be used to create a relatively reliable uncertified home security system. In this guide, you will find the logic for how this can work in the OpenHAB software in our model smart home.

NFC Tag Example in Smart Home
NFC tags in smart homeRating: 
80%

NFC (Near Field Communication) tags are small plastic or paper stickers that can be used to automate various functions in the smart home. In this article, we will show you examples of use and a guide on how to write an action on an NFC tag using a mobile phone.

WireGuard iOS
WireGuard on iOS devicesRating: 
85%

In this article, you will find a detailed guide on how to connect to WireGuard VPN from iOS.

WireGuard on Android device
WireGuard on Android devicesRating: 
0%

In this article, you will find a detailed guide on how to connect to WireGuard VPN from Android.

WireGuard on MikroTikRating: 
90%

This article describes the self setup of the WireGuard VPN protocol on MikroTik devices with RouterOS version 7 and higher. This phenomenal VPN is very fast, secure, and easily configurable in a home environment. It can be said that it is currently the best VPN for home use available.

Nilan VP18 vs OpenHABRating: 
67.2%

We provide tutorial for the connection of the active Nilan recuperation unit, in our case the VP18 K WT type with OpenHAB 3. By communicating via Modbus it is possible to read the whole range of values, but mainly also to control the unit through OpenHAB. This allows us to remotely or programmatically change the performance and ventilation settings depending on the mode (night, cooking, etc.)

PiHome - Chytry dum mereni spotreby elektriny
Energy meter in smart homeRating: 
70.3%

We are providing a simple step-by-step tutorial how to install home energy meter. We did not find any MQTT device, so we buy Aeotec Home Energy Meter as we are already have a Z-Wave controlller in our smart home.